11.23.2010

Homemade Ricotta


Part of being self-reliant is having the tools and skills to innovate in many different circumstances. Knowing basic recipes is one such skill that adds versatility to your home-storage. I love finding recipes that turn ordinary ingredients into something unusual. This is one of those recipes that I both want to keep on hand and that I want to share.


Homemade Ricotta
4 cups whole milk
2 cups heavy cream
1 teaspoon kosher salt
3 tablespoons good white wine vinegar

Set a large sieve over a deep bowl. Dampen 2 layers of cheesecloth with water and line the sieve with the cheesecloth.

Pour the milk and cream into a stainless steel or enameled pot. Stir in the salt. Bring to a boil over medium heat, stirring occasionally. Turn off the heat and stir in the vinegar.

Allow the mixture to stand for 1 minute until it curdles. It will separate into thick parts (the curds) and milky parts (the whey).

Pour the mixture into the cheesecloth-lined sieve and allow it to drain into the bowl at room temperature for 20 to 25 minutes, occasionally discarding the liquid that collects in the bowl. The longer you let the mixture drain, the thicker the ricotta. Transfer the ricotta to a bowl, discarding the cheesecloth and any remaining whey. Use immediately or cover with plastic wrap and refrigerate. The ricotta will keep refrigerated for 4 to 5 days. Makes about 2 cups.


Source:
I found this recipe by Ina Garten in The Costco Connection, November 2010, page 30.

10.27.2010

Canning Grape Juice


It's been a busy few months as we've harvested our garden. The tomatoes, potatoes and squash were a bust, perhaps because of a cool spring and early summer. But, we had an abundant crop of raspberries, peaches, and apples. We've canned peaches, made several different batches of fruit leather (which is already gone), and just recently I canned grape juice.


Grape Juice

1. Pick grapes.
2. Prepare quart bottles. I washed mine in the dishwasher on a sani-rinse.
3. Fill basin of steamer approximately 3/4 full of water.
4. Rinse grapes, picking out leaves or debris. Leave grapes on the stems.


5. Place grapes into steamer. Pack, but don't press.
6. Bring water in basin to a boil. Turn down to medium heat.
7. After about 50 minutes, you will be able to fill one or two still-hot quart bottles.
8. Place flats on full bottles and finger-tighten the rings.
9. Check water in basin. Refill if necessary.


10. After an additional 20 to 40 minutes, you should be able to fill approximately three or four more bottles. Place flats and rings.
11. Process in a water bath for 5 minutes (adjust for elevation). The USDA also adds sugar (which is optional) and an additional step of refrigerating, straining and reheating the grape juice before processing in order to reduce tartaric acid. The tartaric acid crystals don't bother me, so I skip this step. I add my own sugar when using the juice.

Here is a link to official recipes and water bath times: UGA - Grape Juice.


Also:
A. If you aren't going to strain the juice, don't stir or push the grapes or you will get a lot of debris in your bottles.
B. After filling my quarts, I did stir the grapes in the pot and then let it cook a little longer. I saved that juice to strain and serve that day. Approximately two total quarts were taken after the grapes were stirred.
C. I had an apple box and a full shopping bag full of concord grapes. It yielded about 20 total quarts.
D. We reconstitute our juice with a little more than a full additional bottle of water and 1/2 to 1 cup of sugar. Each crop of grapes is different. Adjust to your own taste.

10.02.2010

En Español

Veronica at El rincón de la preparación (The Preparation Corner) translated iPrepared's Three-Month Supply Worksheet into Spanish. Please pass this resource on to any Spanish speakers that would enjoy a copy of the worksheet or Veronica's blog (which is a wonderful preparation resource in Spanish). Thank you to Veronica for all of her work!

Here is the link:
Hoja de almacenamiento

9.22.2010

Grab-N-Go List (partial repost)

There have been a lot of fires here in the Western United States lately, including one not too many miles from my home this past week. Thousands of homes have been evacuated with little notice. I've read story after story about families not knowing what to save as they rush to leave their homes in order to be safe.

Today, I'm reposting a portion of a previous post on prioritized evacuation lists because it might be on your mind right now. It's worth a few minutes to make your own list now. It's tough to remember where things are and what you want to take when you're in a panic.

Please make sure to personalize your list. You'll want to locate copies of your list in multiple locations. Hang a list on your fridge and near each door for easy access.


Sample Grab-N-Go List:

Two Minutes:
Kids
Keys
Purse (check for cell phone)
Tennis shoes
Jacket/coat
Car

Five Minutes:
72-Hour Kits (hooks in garage)
Extra food kit (under coats in mud-room)
Bottled water (car trunks)
Both cars (pull out into driveway)
Vital Info Folder (includes birth certificates, insurance policies, etc.)
Cell phone chargers
Dad's medication
Additional cash

Ten Minutes:
[From this point on my list, I've included two columns under each time amount. The first column are survival items, the second column includes possessions that I want to save.]
Additional clothing (fill suitcases/bags with clothing as if packing for a trip)
Blankets (linen closet & beds)
Additional food (pantry)
******
Scrapbooks (office shelves)
Scrapbook bins (office closet)
Journals (office shelves)
Boys' journals (bedrooms)
Camera/video camera (M/D closet)
Family videos (M/D closet & entertainment center)

Twenty Minutes:
Flashlights/lanterns (basement)
Batteries
Tent (under stairs)
Radio (basement)
Camp stove (basement)
Larger water Bottles (basement)
Sleeping bags (under stairs)
********
Mom's portrait (over the piano)
Computer hard drive (pictures are already backed-up online)
Family pictures (on walls - already have digital backups)

One hour or more:
Portable Potty
Food storage
Air mattress
Shovels
Saw
*********
Dad's published books (office shelves)
Musical instruments
Contents of cedar-chest
Quilts


Some things that aren't on my personal list, but that you'll want to consider:
First-aid supplies (I've already included them in both my cars and our 72-hour kits)
Scriptures (also already in our 72-hour kits)
Pets and pet supplies
Medications
Fuel & generators
Eye glasses/contacts
Jewelry


For more information on creating your personal list, see a more complete post here: Prioritized Evacuation List.

9.15.2010

Fruit Leather

It's harvest time and I've got my hands full of extra fruit. Making fruit leather is an easy way to use up any fruit that isn't ideal for eating or canning. Here are my favorite two methods:

1) Hot Car Method
Make your fruit leather on a clear, hot day. It won't work if it's cloudy or too cool (less than 85 degrees). Puree any combination of fruit in your blender. Place parchment paper into a cookie sheet (cookie sheet must have edges). Spray parchment paper with Pam or wipe with vegetable oil. Pour pureed fruit onto parchment paper until it is about 1/8 to 1/4 inch thick. If it is too thin it will break apart too easily. If it is too thick, it won't dry. Park your car out in the sun. Leave your cookie sheets in the car. It might take two days for the fruit to fully dry. Finish drying in a low-temp oven if it hasn't dried after two days.

2) Dehydrator Method:
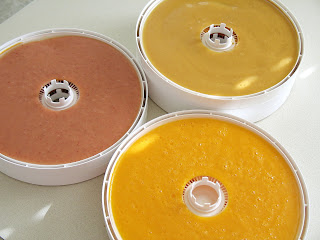
Puree any variety of fruit in your blender. Spray or wipe fruit roll-up trays with Pam or vegetable oil. Pour fruit into trays until full. Turn on dehydrator to recommended temperature. It takes about 24 hours until they are dry. Don't bother to roll and wrap with plastic wrap if your house is like mine. I made my first batch two days ago and it's already gone.

These trays have (clockwise from the top) peaches mixed with applesauce, only peaches, and strawberries mixed with applesauce. I add 1 T. of lemon juice per blender-full of puree to help slow browning. Applesauce is a great extender. I buy it in #10 cans at Costco for about $4.

I dried this batch too long and it crackled apart. It still tastes good, but is harder to roll onto plastic wrap.


For more information: Dehydrating Foods At Home

9.09.2010

Fall Reminders


My kids have already headed back to school. My home is much more quiet and clean. You might find yourself with more time to address preparedness. Here are several suggestions for renewed efforts:


1) Keep working on your three-month supply.

You can use the iPrepared worksheet for a one-week supply or some other source. Resolve to at least make a menu this fall. It's so easy to drop a one-week supply menu into your purse or pocket to keep on hand for grocery trips.


2) Look for fall sales.

Here in Utah, the case lot sales are starting. Fellow preparedness blogger, Prepared LDS Family, has a fantastic comparison price sheet to help find the good buys. (I don't think that the Maceys sales have been added to her link yet.) Shopping sales is a great way to save a little money that you can then put towards your three-month supply.


3) Review backpack emergency kits.

My kids all have new bags, which means that their old pocket-sized emergency kits are either still in their old bags or have been thrown away. Back to school is a great time to refresh those supplies and make sure that your kids have a few necessities on hand.


4) Learn a new food preservation skill.

A lot of local produce is cheap right now as it is being harvested. It's also time to start picking fruit and vegetables from your own trees and gardens. A great self-reliance skill is to be able to provide and preserve your own fruits and vegetables year round. Local extension services often offer classes on food preservation techniques. Don't be overwhelmed by pressure cookers and canners. You can start by learning dehydrating and cold-storage techniques that can extend your harvest and don't even require special equipment, just a little knowledge.


9.04.2010

Lessons from New Zealand

After yesterday's 7.0 earthquake in New Zealand, power has been restored to the majority of homes. However, many of the residents are still without water. Many water and sewer lines were severed in the earthquake. Because of the sewage contamination, many backup drinking-water sources have also been compromised.

The New Zealand Herald is reporting that "There is a shortage of drinkable water in Waimakariri, mostly Kaiapoi. The Selwyn District has nearly returned to normal in urban centres but rural areas remain problematic. Rolleston's water is contaminated. Residents of Canterbury still advised to boil water prior to use, also to avoid recreational use of water as rivers have been affected with sewage."

We've seen this same scenario over and over in varied situations. Once the dust settles, the primary concern is water. Water sources are often compromised at best and non-existent at worst. Water supplies are already on their way to Christchurch, but obviously it is going to take some time to distribute it to those who need it.

So, what do I want you to do with this information? Store Water! You don't have to have special equipment - just a clean, empty soda bottle. Swish with 1 teaspoon of bleach mixed with about a quart of water, rinse well and fill with chlorinated water. Start now. In my opinion, it's the most important part of your home storage.

Past posts on water:
Two Weeks
Haiti
Prepared in Houston
Would I Have Been Ready?


Sources:The New Zealand Herald - Latest News Christchurch Earthquake
The New Zealand Herald - City Awakes to Billion-Dollar Aftershock
Safe Drinking Water (includes instructions for non-chlorinated water)

8.23.2010

Apologies

Sorry for the blank and random posts today. I often work on a post for several months. I post date the entry while I'm working on it. Sometimes, those posts sneak up on me and publish without being finished (or even started).

8.11.2010

My Three-Month Supply

This is a one-week supply for our family of five (which includes two teenage boys).*

Think it takes too much space to store a three-month supply? This is the same one-week supply as above with everything stacked. It doesn't take much space at all!


Hopefully with the Three-Month Supply Worksheet that I posted a few weeks ago, you've been able to find out that gathering a three-month supply is much easier than you'd imagined - especially if you work at it one week at a time. Though you should not use my menu (and should only include what YOUR family eats), I know that sometimes seeing someone else's plan can help you to scrutinize your own eating habits and develop a successful menu for your own family. So today, I'm including an example of my own Three-Month Menu Plan.


Our Three-Month Supply Menu
Multiply these one-week amounts by 13 for a Three-Month Supply

Breakfast
Monday - Cereal/Milk
Tuesday - Oatmeal/Juice
Wednesday - Pancakes/Milk
Thursday - Cereal/Milk
Friday - Oatmeal/Juice
Saturday - Pancakes/Milk
Sunday - Cereal/Milk

Lunch
Monday - Mac-n-Cheese/Juice
Tuesday - PB & Honey Sandwiches/Milk
Wednesday - Jambalaya/Milk
Thursday - PB&J Sandwiches/Milk
Friday - Pizza/Juice
Saturday - Chicken Salad Sandwiches/Pickles/Juice
Sunday - Easy Soups (Spaghettios, Soup, Raviolis, Chili)/Milk

Dinner
Monday - Taco Soup/Mandarin Oranges/Milk
Tuesday - Pasta with Meat and Marinara Sauce/Peas/Peaches/Milk
Wednesday - Burritos/Apple Sauce/Milk
Thursday - Black Beans and Rice/Mandarin Oranges/Corn/Milk
Friday - Wild Rice Soup (includes carrots), Peaches, Juice
Saturday - Chicken Alfredo and Pasta/Peaches/Corn/Juice
Sunday - Curry Chicken/Peas/Apple Sauce/Milk


Note: These are selections from our family menu that are a part of our normal, daily diet. That doesn't mean that we eat all of these items every week. I've picked these particular meals because they store well and we eat them often enough that they are familiar and can be easily rotated. For example, I probably serve Taco Soup about once every-other month - or 6 times a year. I've stored 13 meals-worth of Taco Soup for our three-month supply. We eat it regularly enough that I would be able rotate through all 13 servings in about two years -- well within expiration dates. My family likes it enough that they would be happy to eat it more often if needed.

Also: Our day-to-day menu includes a lot of fresh fruits and vegetables. This menu does not reflect that fresh produce, but instead only includes preserved produce or canned items which we also use. We grow a garden, berries and fruit trees and I count on these to be part of my three-month supply. I plan to add more fresh fruits and vegetables to these menus as it is available.


*Picture is missing a small bottle of mayo, one can of cream of chicken soup, one can of chicken broth, and an additional box of cereal.

8.06.2010

Prioritized Evacuation List (Grab-N-Go)

Lisa recently wrote,

"I live in Southern California and recently we had a wildfire very close to homes and a lot of my friends had to evacuate. They gathered most of their important documents and scrapbooks and things. But while staying away from their homes, all they could think about was what they had forgotten. So we have all been trying to come up with some (kind) of "evacuation list" to be prepared for any other situation like this. Do you have any ideas for this or any resources that we can turn to?"

I think it is a great thing to have a prioritized evacuation list. In a stressful situation, it can be hard to think clearly. If you have a list, you can rely on it to remind you of important items without stressing that you're forgetting something. You'll want to locate copies of your list in multiple locations. Hang a list on your fridge and near each door for easy access.

Each family's list is going to be different. Perhaps a certain toy is essential to comfort a toddler in your family. For your family, that toy will need to be towards the top of the list. A different family might have a special family portrait that is important to save.

Every evacuation situation is also going to be different. You might only have two minutes or you might have twenty minutes to gather items. I've broken my evacuation list into time amounts, guessing what I can gather in that amount of time. If my guesses are wrong, I'm still okay because the list starts with the most important items and moves to less important items. I've also included the location of each item. Listing the location will save precious time as it reminds you of where things are and saves you from describing the location to anyone else who might be there to help.

In an actual evacuation, you might choose to skip items on the list depending upon the situation. In a fire, you would probably choose to skip things like sleeping bags and tents, knowing that you will have family, a shelter, or a hotel available to you and instead concentrate on getting valuables out of your home. In an earthquake, your priority might be gathering survival items and food out of a broken home before another aftershock hits. In a gas leak evacuation, you'll just be trying to get out as fast as possible with only absolute necessities. It's impossible to predict when you might need this list or what the circumstance will be. So I've made one easy-to-find list that I can adapt accordingly.


My Grab-N-Go List:

Two Minutes:
Kids
Keys
Purse (check for cell phone)
Tennis shoes
Jacket/coat
Car

Five Minutes:
72-Hour Kits (hooks in garage)
Extra food kit (under coats in mud-room)
Bottled water (car trunks)
Both cars (pull out into driveway)
Vital Info Folder (includes birth certificates, insurance policies, etc.)
Cell phone chargers
Dad's medication
Additional cash

Ten Minutes:
[From this point on my list, I've included two columns under each time amount. The first column are survival items, the second column includes possessions that I want to save.]
Additional clothing (fill suitcases/bags with clothing as if packing for a trip)
Blankets (linen closet & beds)
Additional food (pantry)
******
Scrapbooks (office shelves)
Scrapbook bins (office closet)
Journals (office shelves)
Boys' journals (bedrooms)
Camera/video camera (M/D closet)
Family videos (M/D closet & entertainment center)

Twenty Minutes:
Flashlights/lanterns (basement)
Batteries
Tent (under stairs)
Radio (basement)
Camp stove (basement)
Larger water Bottles (basement)
Sleeping bags (under stairs)
********
Mom's portrait (over the piano)
Computer hard drive (pictures are already backed-up online)
Family pictures (on walls - already have digital backups)

One hour or more:
Portable Potty
Food storage
Air mattress
Shovels
Saw
*********
Dad's published books (office shelves)
Musical instruments
Contents of cedar-chest
Quilts


Some things that aren't on my personal list, but that you'll want to consider:
First-aid supplies (I've already included them in both my cars and our 72-hour kits)
Scriptures (also already in our 72-hour kits)
Pets and pet supplies
Medications
Fuel & generators
Eye glasses/contacts
Jewelry

Did I miss anything? Please share if you have an idea of something else that might need to be included in these lists. Thanks!


Here are some other examples and ideas:
Prepared LDS Family - List
Rim Family Services
Natural Disasters Evacuation Possessions Survival
Mountain Living