2.01.2011

Political Unrest & Traveling

Praying: Minnesota native Pastor Peter Johnson and his family are
among the thousands of Americans currently waiting at Cairo airport
 for a flight out as Egyptians took to the street . . .

There are many reasons why becoming self-reliant and prepared are good ideas. In just the past two years, we've seen hurricanes, floods, earthquakes, job loss, underemployment, inflation, etc. In each case, those who have been prepared have been able to take care of their families and then reach out to others in need. 

The news headlines of the past few days have showed another instance where preparedness is a huge blessing. Egypt is reporting that food staples are running out in Cairo. Stores are closed and boarded up for protection. Shipments aren't making it into the city.  Gas is not available and banks are closed.  Cell phones and internet connections have been turned off.  "The street demonstrations have made family members unwilling or unable to shop for food items."  (CNN2)  The political unrest is spreading in the region and governments aren't even functioning, let alone helping.  I'm sure that being prepared wouldn't completely alleviate an Egyptian citizen's feelings of concern.  But knowing that you had a food supply and could feed your family would allow you to concentrate on other issues. 

I also want to note that it's important to be aware of preparedness even when you are traveling.  There are many travelers stuck in Egypt in these conditions.  I was in Beijing during the height of the Tienanmen Square demonstrations in 1989.  When planning our trip, we had no idea that it would coincide with the political unrest in the area.  Much of the city was shut down while we were there.  We did fine and never went without food, but the potential was there for us to encounter problems similar to those in Egypt.  These are dramatic events.  Sometimes, though, a situation as simple as a snow storm can ground you and put you in tenuous circumstances while traveling. 

It's impossible to transport many preparedness items as you travel - especially if you are flying.  But as you are able, make a habit of assessing your situation and stocking up as much as is reasonable - wherever you are.  If you are on an extended business trip, make a quick trip to a convenience store and grab a few extra boxes of granola bars and bottles of water.  You may end up never using them and instead giving them away before you leave, but it would give you a bit of a back up.  And though it seems obvious, make a habit of watching the news and find out the weather, politics, etc. before you travel.  You can anticipate possible situations better and be prepared because of your knowledge. 


Sources:
1 - Food staples starting to run out in Egypt - By Salma Abdelaziz, CNN
4 - Photo (Getty Images)

1.10.2011

Canning Chicken

Our local stores have chicken breasts for $1.39 a pound this week so I pulled out my never-used-before pressure cooker and finally tried canning chicken. Knowing how to process and preserve your own foods is a great self-reliance skill. I admit, though, that I was a little nervous because of an infamous family story of my grandmother's pressure cooker blowing up while full of red beets (no one was hurt, but the walls were RED!).
I thawed the frozen chicken by placing it into a bowl of warm water for about 20 minutes. This is about five pounds of chicken. I did a total of 20 pounds.
When it was completely thawed, I trimmed off any fat on the chicken (which wasn't much). I then put the breasts into clean jars with about 1 inch of head space. I didn't add any water. I could have added a 1/2 teaspoon of salt, but because the chicken had already been injected with some broth, I choose not to add the salt.
After wiping the jar tops and fastening lids and rings onto the pint jars, I placed them into my pressure canner with 3 quarts of water and fastened the pressure-cooker lid (the water amount will vary - see your own manual for specific instructions). My 16-quart pressure canner states that it will process 10 pints at a time, but it really only did 8 - maybe because I used wide-mouth jars. Each jar held about one pound of chicken.

My pressure canner manual states to cook meats at 13 pounds of pressure (adjusted for my own altitude of 5700 feet above sea level) for 75 minutes (90 minutes for quarts).

I think this was the hardest part of processing the chicken. Every pressure canner works differently. I had to carefully read the manual several times. Make sure to read yours carefully for water amounts, pressure required, and processing times (always adjusting for altitude as described in your manual). I vented mine for 10 minutes, added the weight, brought up the pressure, processed for 75 minutes and then let the cooker drop pressure and cool. It required some watching to maintain the pressure at 13 pounds. By the third batch, I had a pretty good idea of where to set my stove top and was able to get some other things done.

This is the result! I did 20 pints of chicken (each pint is about one pound of chicken). Prepping the chicken was easy. Learning to use the pressure cooker was a little harder, but now that I've done it, I won't be hesitant to do it again!

1.04.2011

Home Storage for Singles and Newlyweds

Think home storage is just for families? If so, you might want to check out these articles full of preparedness tips for singles and newlyweds:


Two Cans of Corn: Home Storage for Newlyweds

By starting small, wisely using storage space, saving money, and gradually increasing their efforts, newly married couples can experience the blessings of peace and security that come from home storage.


Being Independent, Being Prepared

How some young adults are applying principles of preparedness to their busy, mobile lives.

12.26.2010

Serving Others

I am completely convinced that we are blessed in our lives with so much abundance so we can help others. I think home storage plays a similar roll. When we have an abundant home storage, then we can take our of our family's needs and still help those around us.

I want to wish you all a Merry Christmas and urge you find a way to help others during this Christmas season. Make it a family tradition! Our annual family service tradition brings the Spirit of Christ and Christmas into our home especially when selfishness threatens to prevail.

The first commandment is to Love God and "the second is like, namely this, Thou shalt love thy neighbor as thyself. There are NONE other commandment greater than these." (The Holy Bible, Mark 12: 31) I don't know of a better way to show love to God and our neighbors than by serving others. In fact, Christ was teaching us this principle when he said, "Inasmuch as ye have done it unto one of the least of these my brethren, ye have done it unto me." (The Holy Bible, Matthew 25: 40)

Be generous with your funds, time and talents. And be generous about the circumstances of others. Everything that we have comes from God. "Do we not all depend upon the same Being, even God, for all the substance which we have? . . . O then, how ye ought to impart of the substance that ye have one to another." (The Book of Mormon, Mosiah 4: 19, 21)

I know that Jesus Christ, my brother lives again. Merry Christmas!

12.21.2010

The Value of Nesquik

For the past few months, I have been cooking with a probably twelve year-old #10 can of Rainy Day instant powdered milk. I use it primarily for baking and I haven't had any problems with it. For the first time in years, we ran out of milk this morning. So, I made some up using my powdered milk.

Everyone raved over the peppermint cocoa served with the powdered milk just as they came in from a snowy morning of sledding. However, my four year old commented on his cup of straight milk served at dinner tonight, "Mom, this milk smells funny." I picked up my cup and cringed as I realized that I might not be able to stomach the milk either. After a mutiny by the entire family, I pulled out the Nesquik (which I used to know as Nestle Quik) to make "chocolate milk." Every time someone commented on the yucky milk, my teen-aged son would add an additional tablespoon-full to his glass. The Nesquik wasn't great, but the milk tasted worse without it.

I've always kept a few containers of Nesquick in my storage and I'll make sure to continue to do so for situations like this. This is also a good reminder to make sure that you taste and like the powdered milk that you choose to store for drinking. What you store for cooking matters less.

Click here for past posts on powdered milk.

11.23.2010

Homemade Ricotta


Part of being self-reliant is having the tools and skills to innovate in many different circumstances. Knowing basic recipes is one such skill that adds versatility to your home-storage. I love finding recipes that turn ordinary ingredients into something unusual. This is one of those recipes that I both want to keep on hand and that I want to share.


Homemade Ricotta
4 cups whole milk
2 cups heavy cream
1 teaspoon kosher salt
3 tablespoons good white wine vinegar

Set a large sieve over a deep bowl. Dampen 2 layers of cheesecloth with water and line the sieve with the cheesecloth.

Pour the milk and cream into a stainless steel or enameled pot. Stir in the salt. Bring to a boil over medium heat, stirring occasionally. Turn off the heat and stir in the vinegar.

Allow the mixture to stand for 1 minute until it curdles. It will separate into thick parts (the curds) and milky parts (the whey).

Pour the mixture into the cheesecloth-lined sieve and allow it to drain into the bowl at room temperature for 20 to 25 minutes, occasionally discarding the liquid that collects in the bowl. The longer you let the mixture drain, the thicker the ricotta. Transfer the ricotta to a bowl, discarding the cheesecloth and any remaining whey. Use immediately or cover with plastic wrap and refrigerate. The ricotta will keep refrigerated for 4 to 5 days. Makes about 2 cups.


Source:
I found this recipe by Ina Garten in The Costco Connection, November 2010, page 30.

10.27.2010

Canning Grape Juice


It's been a busy few months as we've harvested our garden. The tomatoes, potatoes and squash were a bust, perhaps because of a cool spring and early summer. But, we had an abundant crop of raspberries, peaches, and apples. We've canned peaches, made several different batches of fruit leather (which is already gone), and just recently I canned grape juice.


Grape Juice

1. Pick grapes.
2. Prepare quart bottles. I washed mine in the dishwasher on a sani-rinse.
3. Fill basin of steamer approximately 3/4 full of water.
4. Rinse grapes, picking out leaves or debris. Leave grapes on the stems.


5. Place grapes into steamer. Pack, but don't press.
6. Bring water in basin to a boil. Turn down to medium heat.
7. After about 50 minutes, you will be able to fill one or two still-hot quart bottles.
8. Place flats on full bottles and finger-tighten the rings.
9. Check water in basin. Refill if necessary.


10. After an additional 20 to 40 minutes, you should be able to fill approximately three or four more bottles. Place flats and rings.
11. Process in a water bath for 5 minutes (adjust for elevation). The USDA also adds sugar (which is optional) and an additional step of refrigerating, straining and reheating the grape juice before processing in order to reduce tartaric acid. The tartaric acid crystals don't bother me, so I skip this step. I add my own sugar when using the juice.

Here is a link to official recipes and water bath times: UGA - Grape Juice.


Also:
A. If you aren't going to strain the juice, don't stir or push the grapes or you will get a lot of debris in your bottles.
B. After filling my quarts, I did stir the grapes in the pot and then let it cook a little longer. I saved that juice to strain and serve that day. Approximately two total quarts were taken after the grapes were stirred.
C. I had an apple box and a full shopping bag full of concord grapes. It yielded about 20 total quarts.
D. We reconstitute our juice with a little more than a full additional bottle of water and 1/2 to 1 cup of sugar. Each crop of grapes is different. Adjust to your own taste.

10.02.2010

En Español

Veronica at El rincón de la preparación (The Preparation Corner) translated iPrepared's Three-Month Supply Worksheet into Spanish. Please pass this resource on to any Spanish speakers that would enjoy a copy of the worksheet or Veronica's blog (which is a wonderful preparation resource in Spanish). Thank you to Veronica for all of her work!

Here is the link:
Hoja de almacenamiento

9.22.2010

Grab-N-Go List (partial repost)

There have been a lot of fires here in the Western United States lately, including one not too many miles from my home this past week. Thousands of homes have been evacuated with little notice. I've read story after story about families not knowing what to save as they rush to leave their homes in order to be safe.

Today, I'm reposting a portion of a previous post on prioritized evacuation lists because it might be on your mind right now. It's worth a few minutes to make your own list now. It's tough to remember where things are and what you want to take when you're in a panic.

Please make sure to personalize your list. You'll want to locate copies of your list in multiple locations. Hang a list on your fridge and near each door for easy access.


Sample Grab-N-Go List:

Two Minutes:
Kids
Keys
Purse (check for cell phone)
Tennis shoes
Jacket/coat
Car

Five Minutes:
72-Hour Kits (hooks in garage)
Extra food kit (under coats in mud-room)
Bottled water (car trunks)
Both cars (pull out into driveway)
Vital Info Folder (includes birth certificates, insurance policies, etc.)
Cell phone chargers
Dad's medication
Additional cash

Ten Minutes:
[From this point on my list, I've included two columns under each time amount. The first column are survival items, the second column includes possessions that I want to save.]
Additional clothing (fill suitcases/bags with clothing as if packing for a trip)
Blankets (linen closet & beds)
Additional food (pantry)
******
Scrapbooks (office shelves)
Scrapbook bins (office closet)
Journals (office shelves)
Boys' journals (bedrooms)
Camera/video camera (M/D closet)
Family videos (M/D closet & entertainment center)

Twenty Minutes:
Flashlights/lanterns (basement)
Batteries
Tent (under stairs)
Radio (basement)
Camp stove (basement)
Larger water Bottles (basement)
Sleeping bags (under stairs)
********
Mom's portrait (over the piano)
Computer hard drive (pictures are already backed-up online)
Family pictures (on walls - already have digital backups)

One hour or more:
Portable Potty
Food storage
Air mattress
Shovels
Saw
*********
Dad's published books (office shelves)
Musical instruments
Contents of cedar-chest
Quilts


Some things that aren't on my personal list, but that you'll want to consider:
First-aid supplies (I've already included them in both my cars and our 72-hour kits)
Scriptures (also already in our 72-hour kits)
Pets and pet supplies
Medications
Fuel & generators
Eye glasses/contacts
Jewelry


For more information on creating your personal list, see a more complete post here: Prioritized Evacuation List.

9.15.2010

Fruit Leather

It's harvest time and I've got my hands full of extra fruit. Making fruit leather is an easy way to use up any fruit that isn't ideal for eating or canning. Here are my favorite two methods:

1) Hot Car Method
Make your fruit leather on a clear, hot day. It won't work if it's cloudy or too cool (less than 85 degrees). Puree any combination of fruit in your blender. Place parchment paper into a cookie sheet (cookie sheet must have edges). Spray parchment paper with Pam or wipe with vegetable oil. Pour pureed fruit onto parchment paper until it is about 1/8 to 1/4 inch thick. If it is too thin it will break apart too easily. If it is too thick, it won't dry. Park your car out in the sun. Leave your cookie sheets in the car. It might take two days for the fruit to fully dry. Finish drying in a low-temp oven if it hasn't dried after two days.

2) Dehydrator Method:
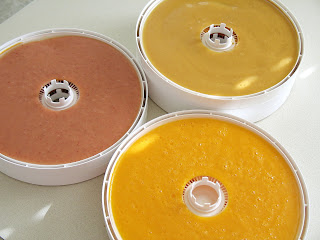
Puree any variety of fruit in your blender. Spray or wipe fruit roll-up trays with Pam or vegetable oil. Pour fruit into trays until full. Turn on dehydrator to recommended temperature. It takes about 24 hours until they are dry. Don't bother to roll and wrap with plastic wrap if your house is like mine. I made my first batch two days ago and it's already gone.

These trays have (clockwise from the top) peaches mixed with applesauce, only peaches, and strawberries mixed with applesauce. I add 1 T. of lemon juice per blender-full of puree to help slow browning. Applesauce is a great extender. I buy it in #10 cans at Costco for about $4.

I dried this batch too long and it crackled apart. It still tastes good, but is harder to roll onto plastic wrap.


For more information: Dehydrating Foods At Home